

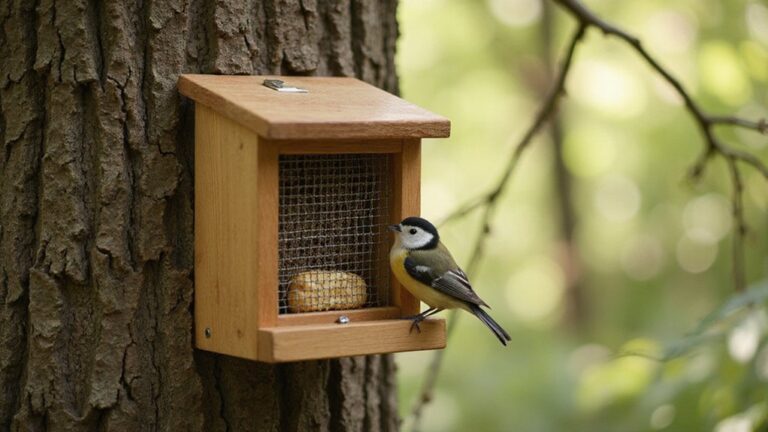
Want to keep squirrels from stealing your suet? Building a simple, effective squirrel-proof feeder for under $20 is easier than you might think.
With just some wire mesh, tools, and a little DIY know-how, you can create a barrier that keeps those clever critters out.
Follow these straightforward steps, and your suet will stay safe and available for the birds.
Why Hardware Cloth Beats Everything for Squirrel-Proofing
Hardware cloth is the best choice for squirrel-proofing because it offers superior durability and security. Its metal mesh resists chewing and weathering far better than plastic netting. With 1/4-inch openings, it effectively prevents squirrels from squeezing, reaching into, or prying open the food compartment. This open grid still allows woodpeckers to cling and feed through the gaps comfortably. The main advantage is predator deterrence; squirrels cannot gnaw through or enlarge the small openings, ensuring your suet remains safe. For enhanced protection, consider pairing this design with top bee traps that target carpenter bees, which also threaten outdoor feeders. Unlike plastic mesh, which often sags or tears under heavy use, hardware cloth netting provides a rigid structure that lasts for multiple seasons. Wrapping a cage of galvanized hardware cloth around your feeder creates a long-lasting barrier that holds its shape under stress and withstands outdoor conditions for seasons. Choosing hardware cloth over flimsy plastic saves money in the long run and provides a truly effective, squirrel-proof solution. For additional defense, mounting a squirrel baffle at the top of the feeder pole can block agile climbers from accessing the feeder from above.

Size Specification: 2 sheets wire mesh, the size of each piece is 13.7 x 40 inches, wire diameter 0.52 mm

Galvanized After Welding: Hot-dip galvanized after welding coats every welded joint, so the heavy duty mesh resists rust and breakage far longer than pre-galvanized wire in rain, soil, and sun.Thicker wire builds a sturdier fence that resists bending and animal push-through

Product Details: ArdeFentium 8in x 25ft hardware cloth chicken wire roll with 1/4 inch square openings and 23 gauge steel wire is ideal for small animal barriers and chicken fence projects. This 1/4 inch wire mesh is perfect for repairing damaged areas, adding extra protection to existing garden fencing, coop doors and fence bottoms.
3 Tools and 2 Materials You’ll Need for Under $20
You only need three tools and two materials to build your suet feeder for under $20. A power drill is essential for making pilot holes, ensuring your wire mesh stays secure without cracking. Wire cutters are used to trim the mesh to the right size, while pliers help bend and fasten the wire or zip ties to hold everything in place. For materials, choose small-grid wire mesh—like 1/2-inch hardware cloth—that keeps squirrels out but allows birds to access the food. Fastening wire or zip ties are affordable options for securing the components.
All these supplies are budget-friendly, with total costs rarely exceeding $20. You can even cut costs further by reusing scrap wire or mesh, dropping the price as low as $6. Weather-resistant metal is preferred to withstand the elements and extend your feeder’s lifespan. Keep your design simple, with no extra parts needed, and consider leaving a small access point if you want to add solar lighting later on.

【Durable Material & Size】Our hardware cloth measures 16in x 50ft with a 1/2 inch square opening, made of 19 gauge hot-dipped galvanized steel. This hardware cloth 1/2 inch is strong, rust-resistant, and designed for long-lasting outdoor use
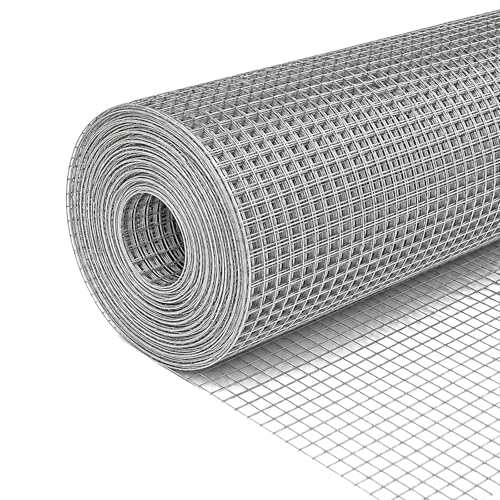
Hardware Cloth 1/2inch for Chicken Coop – 16 inch x 50 ft welded wire mesh made from 23-gauge galvanized steel hardware cloth. Provides reliable strength and flexibility for chicken wire fencing, garden protection, and general outdoor use

Material and size: The size of the hardware cloth is 16 inch×50 ft and 1/2 inch×1/2 inch thickness, adopt 19 guage hot-dipped galvanized material
The Simple U-Shape Retrofit for Existing Suet Feeders
To retrofit an existing suet feeder to prevent squirrel raids, use a simple U-shaped shell made from small-grid hardware cloth. Start by cutting a rectangle about an inch wider than your feeder on each side and long enough to wrap around its lower section. Make four corner cuts at the U’s base, then fold the bottom square upward. Bend the side flaps over the edges, similar to wrapping a package. Secure the final side with a twist tie or an old bread tie. Ensure the shell sits slightly larger than the feeder to prevent crowding the suet. This quick modification makes it difficult for squirrels to access the food while allowing small birds to feed freely. For a more robust deterrent, you can reuse cheap materials from a DIY rat bait station to reinforce the shell. For instance, incorporating a similar high-voltage grid concept can further discourage persistent pests from chewing through the wire. The entire process can be done in minutes, providing a sleek, effective squirrel exclusion method without altering the overall look of your feeder. For those seeking additional strategies, commercial wasp traps can also be tested for other yard pest issues. This spring mechanism automatically closes ports when a squirrel climbs onto the feeder, which similarly saves food by preventing theft.
Build a Full Box-Style Squirrel-Proof Feeder From Scratch
Build a full box-style squirrel-proof suet feeder from scratch, start with a simple cube-shaped cage made from small-grid hardware cloth. Cut the base, sides, and top panels to size and then bend them into right angles using pliers. Secure the edges tightly with wire to eliminate gaps that squirrels can exploit. Keep the openings small—using 3/8-inch mesh—so that birds can feed directly through but larger animals cannot reach the suet. The compact cube shape forces animals to work around the cage rather than directly into it, enhancing squirrel-proofing. For extra durability, treat the wire with a weather-resistant spray similar to those used for wasp nest protection to prevent rust over time. This spray offers proven protection against moisture damage, just as a bee suit shields you from wasp stings by creating a physical barrier. Additionally, maintain the mesh’s integrity by checking for bent wires after storms, since even minor deformities can create entry points for persistent pests.
You can add a splash of color or camouflage by painting or wrapping the wire to match your yard’s aesthetic. Mount the finished feeder at a height of at least five feet above ground level, away from launch points like branches or nearby structures. This placement further deters predators and prevents easy access. Ensure that all wire joints are strongly secured; weak seams can become quick entry points for determined squirrels. Because the build uses durable metal, it will outlast plastic options while remaining low-cost, making it a long-lasting addition to your bird feeding station.
Heavy Duty Chicken Wire – True 19 Gauge Steel: This 16in x 10ft chicken wire roll is built from real 19 gauge welded steel for dependable strength. Unlike thin or flimsy mesh, it holds its shape after installation, making it ideal for reinforcing chicken coops and outdoor fencing.

STURDY CONSTRUCTION — 304 STAINLESS STEEL:GMOTLSE 304 stainless steel hardware cloth is made of genuine 304 stainless steel with solid welding points and strong tensile strength, ensuring the mesh holds its shape under long-term use. Even when exposed to moisture or outdoor elements, this 304 stainless steel wire mesh stays rust-free and reliable for years

Hardware cloth is made of stainless steel wire, wear-resisting, for rust resistance and long life. Can contact with soil fence to protect poultry and houses.
Add a Lid That Opens for Easy Refilling
Adding a lid that opens easily for refilling enhances your bird feeder’s functionality. Choose a large-mouth, wide-opening lid to make inserting suet cakes straightforward and less messy. Use durable metal for the lid to resist chewing from squirrels and to withstand weather conditions better than plastic. Attach a sturdy hinge and a locking clasp to keep the lid secure against wind and to prevent animals from prying it open. Overhanging edges on the lid shed rain and snow, protecting the suet inside from moisture. This design also makes cleaning easier—just open the lid fully, scrub with mild soap, and dry before refilling. You can leave the feeder hanging while opening the lid, simplifying the refill process and reducing mess. This feeder’s sturdy metal build enhances longevity, withstanding rain, snow, and squirrel activity. This lid design works similarly to how a DIY yellow jacket trap uses a simple container and bait to keep pests away, by prioritizing secure closure and durable materials. Properly chosen materials and secure attachments ensure the lid stays functional, squirrel-resistant, and weatherproof. For the best support, use galvanized steel posts to anchor the feeder structure, as they resist rust and chewing better than wood. When comparing pest-control solutions, fruit fly traps often rely on similar principles of containment and durable entry points to block unwanted access, just as this lid’s clasp and hinge prevent squirrels from forcing it open.
Place Your Squirrel-Proof Feeder to Outsmart Rodents
To effectively outsmart squirrels, place your suet feeder at least 5 to 6 feet above the ground on a smooth, sturdy pole. This height makes it difficult for rodents to access the feeder from ground level and disrupts their launching strategy. Positioning the feeder this high also helps protect birds by giving them a clear escape route if a predator approaches. Keep the feeder at least 10 feet away from any jump points like trees, fences, or shrubs, which reduces the chance of squirrels mounting an attack. Adding a baffle beneath the feeder further prevents climbing attempts, while choosing open, partly shaded areas makes birds feel secure without inviting rodents. Avoid placing the feeder near dense shrubbery or fences that can attract mice and rats. Regular cleaning to minimize spillage also reduces rodent attraction, helping your suet feeder serve the intended feathered visitors more effectively. For persistent climbing pests, consider positioning the feeder to mimic the carpenter bee trap principle of using a smooth vertical surface to frustrate grasping attempts.
Common Mistakes That Ruin a Squirrel-Proof Design
Even with a carefully designed squirrel-proof feeder, common mistakes can make it easy for rodents to access the suet. One major error is poor launch-point clearance. If your feeder is positioned closer than 7 feet from a tree trunk or branch, squirrels can easily leap onto it and bypass your deterrents. Proper mounting is also crucial; a shepherd’s hook stuck into soft soil provides little resistance as squirrels lean and climb, whereas a smooth metal pole with a baffle effectively prevents access. Additionally, avoid using side-access openings in the feeder body, as these allow squirrels to grab suet without triggering any mechanisms meant to deter them. Using weak materials like thin plastic or soft wood results in quick chew-through, undermining your defenses. Finally, decorative accents can compromise the design—adding seed or removing features like catch trays can create unintended access points or reduce effectiveness. For best results, always ensure sufficient spray coverage when applying treatments to the feeder surface to deter chewing. Unlike skunks, squirrels are not repelled by coyote urine scent as a long-term deterrent, so physical barriers remain essential. For long-term pest prevention, choosing a mosquito dunk for standing water areas can also help control other garden pests.
Maintenance Tips for a Long-Lasting Feeder
Regular cleaning is essential to keep your suet feeder in good shape and prevent the buildup of mold, rancid fat, and disease. Wash the feeder in warm, soapy water, then rinse thoroughly to remove soap residue, which is especially important if your dog might scavenge dropped suet. For a deeper clean, soak the feeder in a solution of one part bleach to nine parts water, then rinse multiple times to eliminate any bleach traces. Use a soft brush to scrub mesh corners and crevices, preventing moisture from lingering and causing rot. Before refilling, dry the feeder completely in the sun to inhibit spoilage. Position the feeder in a spot where it dries quickly after rain, and rake debris underneath to reduce bacteria growth. Regularly inspect wires and hooks for rust or wear and replace any loose or damaged parts to ensure safety. For gardens with wire structures, consider using a durable galvanized mesh to prevent rust and extend the feeder’s lifespan. When storing the feeder during off-season or bad weather, keep it dry to avoid corrosion and lingering odors. For those dealing with persistent chipmunk problems, using a Havahart trap can help manage the pest population safely and humanely. Additionally, installing bird spikes for roofs nearby can deter larger birds from perching and creating messes around the feeder area.
Optional Upgrades: Roof, Perch, and Hanger
Adding optional upgrades like a roof, perch, or upgraded hanger can significantly improve your feeder’s performance. A peaked roof provides shelter from rain and sun, keeping suet cakes drier and slowing spoilage. Make the roof removable to facilitate easy refilling, and ensure the overhang offers protection without blocking access for clinging birds. Installing a perch encourages perching species such as cardinals, but keep it compact to prevent squirrels from gaining leverage. Upgrading the hanger to a cable or steel rod enhances durability, allowing it to support the weight of suet, moisture, and active birds. For added personality and weather resistance, you can also apply custom paint or decorative trims. While these upgrades improve longevity and appeal, pairing them with a baffle and strategic placement will make your feeder more squirrel-proof and inviting for a broader range of birds. This all-metal structure with a powder-coated finish resists rust, ensuring long-lasting outdoor use even in harsh weather. For best results, use highly attractive bait like fresh vegetables or melon to lure groundhogs into the trap.

Durable All-Metal Construction: Built with full metal cage body for high strength and weather resistance. Designed to last through seasons without cracking, fading, or warping. A reliable choice for year-round outdoor bird feeding

CUTE DESIGN - Weather proof roof shelters suet from the weather, so your suet lasts longer. Durable all-metal structure with powder coated fnish will not rust, great for year-round use!
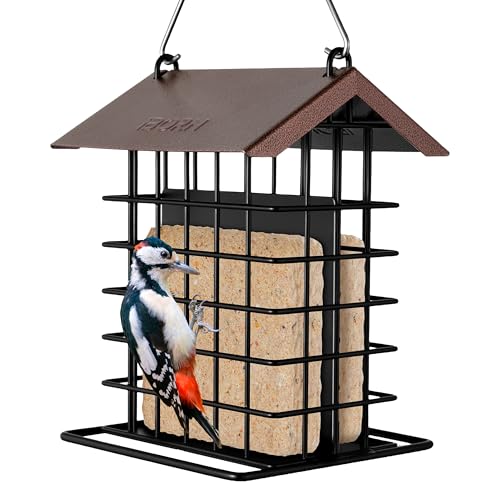
[Squirrel Proof Hook Design] iBorn suet feeder features a anti-squirrel hang hook.Rigorously tested, even when subjected to full pressure by an adult, it cannot bend or break—making it impossible for squirrels to tackle. This design prevents squirrels from accessing the food inside, effectively preventing theft and ensuring the food is exclusively for birds. This not only helps save on feeding costs but also reduces refill frequency, providing a worry-free and efficient bird-feeding experience.