


Struggling to install hardware cloth securely and quickly? You’re not alone—it’s a common challenge for many doing fencing or cage work. Knowing how to measure, cut, and fasten the mesh properly can save you time and ensure your project stays sturdy.
Stay with me, and I’ll walk you through a simple method to get it done right.
How to Measure Length, Height, and Overlap for Your Hardware Cloth
To measure length, height, and overlap for your hardware cloth accurately, start by recording each straight section of your perimeter separately. Measuring in this way reduces waste and minimizes seam errors. For your project’s height, match it to the site requirements, then add 3 to 6 inches for edge attachment, especially in raised beds. When planning seams, overlay the pieces by 4 to 6 inches to prevent pests from entering. Proper overlap ensures seams align correctly; misaligned joints can create gaps that compromise the barrier. If you’re installing a buried barrier, add 6 to 12 inches for depth or include an 18-inch apron to improve effectiveness. For similar pest prevention needs, consider that top bee traps offer specialized designs for carpenter bees. Correct measurement directly influences mesh tension. To cut the mesh cleanly, use tin snips or a similar heavy-duty tool to avoid frayed edges. Planning each section with the proper overlap helps prevent overstretching during fastening. Using cheap materials like wooden stakes can help support the mesh and keep it taut. Maintaining a taut mesh keeps the barrier gap-free, providing long-term protection against digging or chewing animals.

STURDY CONSTRUCTION 304 STAINLESS STEEL GMOTLSE 304 stainless steel hardware cloth is made of genuine 304 stainless steel with solid joints and strong tensile strength ensuring the mesh holds its shape under long term use Even when exposed to moisture or outdoor elements this 304 stainless steel wire mesh stays rust resistant and reliable for years

❶ EXACT SIZE — 4" X 10FT ROLL,NOT A FULL-SIZE SHEET A 4-inch-wide, 10-foot-long narrow strip for gaps, vents and fence bases — not a full sheet you'll never finish. Also in 8、12 and 16-inch widths for full-coverage fencing.

Premium Heavy-Duty Construction: Crafted from high-quality low-carbon steel wire with hot-dip galvanized coating applied after welding for maximum durability. Our 1/4" 23-gauge hardware cloth (12" x 35ft roll) offers exceptional strength while remaining flexible enough for easy installation. Resists breaking, bending, and warping for long-lasting performance
Tools and Materials You’ll Need for Hardware Cloth Installation
To install hardware cloth securely, you’ll need a range of tools and materials. For cutting the mesh, use tin snips or heavy-duty aviation snips to ensure clean, straight cuts. Pliers are essential for bending and smoothing sharp edges that can cause injury or damage. When attaching the hardware cloth to wood frames, a heavy-duty staple gun paired with galvanized staples provides a holding strength that resists rust and corrosion. For masonry or metal surfaces, screws with washers are the best choice to ensure a sturdy attachment. Zip ties are useful for temporary or quick fixes to hold the mesh in place before securing it more permanently. Safety should always come first; heavy work gloves protect your hands from sharp burrs, while safety glasses shield your eyes from flying debris during cutting and attaching. Measuring distances accurately with a tape measure is critical, and marking cut lines with chalk or a pencil helps maintain precision. Look for hardware cloth with a durable coating like galvanized steel, especially if installing outdoors, to prevent rust. If securing to hard surfaces such as concrete, keep masonry drill bits and concrete anchors on hand for proper attachment. Lastly, using support materials like wood posts can help anchor the mesh firmly, especially over larger areas. Achieving correct spacing and fixings prevents sagging or gaps that weaken the overall installation. Note that unlike bee suits, hardware cloth has a proven resistance to wasp penetration due to its rigid galvanized mesh structure. Similarly, mosquito bits offer a targeted biological control method for larvae in standing water, rather than relying on physical barriers.

ATTENTION: Please Read: Our hardware cloth is 20 feet long, 4 inches wide, wire 23 gauge thick and holes 1/4 inch. Please confirm the size before placing the order

Galvanized hardware cloth roll 48 inches x 50 foot with 1/2 inch mesh 19 gauge.

Galvanized After Welding: Hot-dip galvanized after welding coats every welded joint, so the heavy duty mesh resists rust and breakage far longer than pre-galvanized wire in rain, soil, and sun.Thicker wire builds a sturdier fence that resists bending and animal push-through
Cut Your Hardware Cloth Without Wasting Material
To cut your hardware cloth with minimal waste, careful planning is essential. First, measure your project area precisely, then transfer those dimensions onto the cloth, marking cut lines clearly. Before making any cuts, plan all necessary pieces, including allowances for overlaps, to avoid unnecessary scraps. Decide the optimal cut order to keep larger sections intact and reduce the need for multiple small cuts. Unlike the Venus fly trap, which efficiently captures small insects, you must focus on precision to avoid wasted material. For added safety, always wear heavy-duty leather gloves to protect your hands from sharp edges and potential injury.
Maintain proper fabric tension by laying the cloth flat and securing it with clamps. This prevents shifting during cutting, reducing overcuts and uneven edges. For cutting precision, aim your snips close to vertical wires or weld intersections, which results in cleaner edges and less material waste. Use tin snips for straight, controlled cuts, making small, deliberate snips rather than forcing a single large cut. For high-volume production, an electric metal shear offers fast, clean cuts and is more efficient than manual tools. When planning your cuts, remember that trapping a skunk requires a similarly precise approach to avoid common mistakes.
After cutting, trim any sharp ends for safety, and save offcuts for future patches or small enclosures. Recycling scraps not only prevents waste but also ensures you have useful material for repairs or adjustments down the line. Proper planning and careful execution are your best strategies for cutting hardware cloth efficiently and responsibly.

Straight-cut aviation tin snip with high-leverage design and serrated-edge blade for efficient cutting

Precision Straight & Gentle Curve Cuts: Engineered blades enable clean straight lines and smooth curved cuts on sheet metal, copper, aluminum, plastic, thick cardboard, chicken wire, and hardware cloth. Serrated edges ensure stable material grip for accurate, burr-free results.
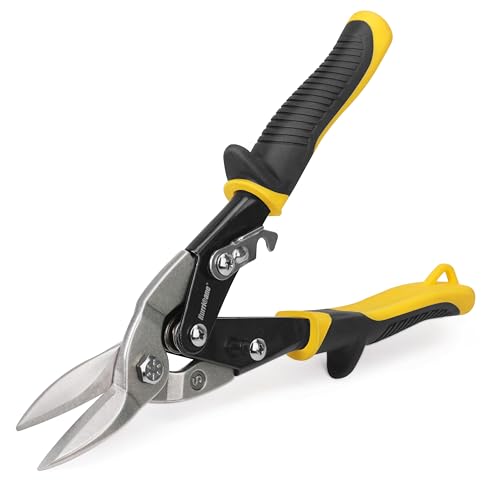
【Purpose-Built for Straight Cuts】Designed for straight-line cutting and wide, gentle curves. These Straight-Cut snips are a reliable choice for HVAC ducts, gutter repairs, and thin metal DIY projects. Note: Not intended for tight circles or sharp angles.
Position and Tighten the Mesh So It Won’t Sag
To keep the mesh from sagging over time, you need to position and tighten it properly. Begin by securing one end to a fixed anchor to create a stable reference point. Work outward from a corner, keeping the mesh flat and taut as you go. Don’t attach the free end loosely; always secure intermediate points to prevent slack from forming. Use the correct fixing spacing to prevent the mesh from pulling away, as outlined in standard installation guides.
Apply controlled tension by pulling the wire slightly—just enough to tighten, but not so much that it distorts the mesh. Use a temporary tensioning tool if needed, and ensure the wire stays aligned with the support surface. After securing each section, recheck the tension to avoid ripples or slack buildup.
Pay attention to support spacing: fasten the mesh every 2 to 4 inches along the perimeter to prevent peeling back or sagging. Add extra fasteners at edges and stress points. Using intermediate supports helps spread the load, reducing the chance of mid-span sagging. For additional protection against spiders, consider using a top-rated bug bomb to address any existing infestations before sealing the area. For pond applications, selecting heavy-duty pond netting ensures the mesh withstands exposure to moisture and debris without degrading. Finally, inspect the entire installation for any slack, wrinkles, or movement. Re-tighten loose areas until the mesh sits flat and there is no visible gap between supports.

EFFICIENT DUCT TENSIONING: Specifically designed to quickly and securely tighten nylon ties on fiberglass duct take-off connections. This tool streamlines HVAC installations by ensuring airtight, professional-grade connections with significantly less manual effort.

【Versatile】: Suitable for various rope types such as camping ropes, clotheslines, and binding cords1 tool serves multiple purposes.

Which Fastener to Use: Tacks, Staples, Screws, or Zip Ties
The best fastener depends on your surface material; choose accordingly. For wood, galvanized staples or U-shaped tacks work well. Drive tacks every 4 to 5 inches, positioning them to straddle a vertical wire for quick holds, but increase the density to maintain proper mesh tension. Galvanized staples offer durability outdoors, resisting rust and corrosion. For concrete or masonry, predrill holes and use masonry screws with washers for secure fastening. Screws provide the strongest clamp and are ideal where pull-out resistance is essential. On metal poles or pipes, UV-resistant zip ties are a good option for quick installation, and stainless steel zip ties are specifically recommended for animal enclosures to ensure a non-destructive method. For a similar pest control application, a DIY yellow jacket trap can be built using cheap materials to keep pests away. Sugar-based baits are highly effective for attracting these insects early in the season. For larger predators, live animal traps for coyotes require heavy-duty mesh and fasteners to prevent escape. Make sure to check material quality to ensure longevity. Whichever fastener you choose, fully secure corners and edges to keep the mesh tight.

Package includes 200 pcs steel Fencing Staples to meet your daily needs. Wire: approx. Ø 2.3 mm / length: 25 mm / width: 14 mm

Sized For Precision: #11 x 1/2 in double pointed tacks provide secure anchoring for wood and fabric attachment; package contains 1.5 oz for versatile use

Premium Material: wire staples are made of high-quality carbon steel with a galvanized surface, making it resistant to oxidation and rust, breakage, and deformation, enhancing durability and maintaining high performance even in harsh environments.
Secure the Top Edge of Your Hardware Cloth First
Start by securing the top edge of your hardware cloth first. Space your fasteners every 4 to 5 inches along the top to ensure even distribution of holding force. Avoid wider gaps, as they can leave the top loose and unstable. Make sure each fastener sits flush against the frame for a clean, secure finish. A level, tight top edge provides a stable anchor point, which allows you to tension the cloth downward without shifting. This top-down method minimizes movement, similar to how fogger longevity depends on stable starting conditions. Complete and secure the top edge entirely before moving downward for a faster, cleaner installation.
Handle Corners and Sharp Wire Ends Without Getting Cut
To handle corners and sharp wire ends safely, start by putting on cut-resistant gloves and eye protection before unrolling the hardware cloth. These sharp edges can catch you off guard and cause injuries if you don’t. This protective gear is essential, especially after trimming corners, where burrs and jagged ends tend to linger. To cut corners cleanly, align your snips with the wire pattern and target welded intersections, avoiding jagged tails that can cause cuts later. After cutting, use pliers to fold or crimp any protruding wire ends inward. This buries the sharp points and reduces the risk of snagging or injury. To further reduce hazards, consider using trap choice and bait techniques from vole trapping to ensure sharp edges are fully secured. Don’t stop there: cover raw edges with metal U-edging or trim them down further to create a fully safe barrier. However, if your hardware cloth is exposed to moisture, you should also check for rust resistance to ensure long-term durability. Before moving on to the next section, carefully inspect each corner and seam, bending, twisting, or trimming any remaining sharp points so they sit flush. Bending inward and securing these edges not only prevents cuts during installation but also makes future maintenance safer. Properly handling corners and wire ends ensures your project remains secure and safe over time.
Bury the Bottom Edge for Ground-Level Protection
Burying the bottom edge of hardware cloth is essential for ground-level predator protection. Dig a trench between 5 to 12 inches deep around the perimeter of your enclosure, ensuring the trench matches the width of the cloth for a smooth, kink-free fit. Bend the bottom of the wire outward at a 90-degree angle to form an L-shape, extending 12 to 18 inches away from the structure. This longer digging path makes it more difficult for predators to dig underneath. This method is effective against most burrowing animals because the galvanized steel mesh resists rust and chewing.
Bury the outward bent edge at least 2 to 3 inches deep, though 6 to 12 inches offers even stronger resistance. Secure the cloth tightly to the frame before backfilling to prevent shifting or movement. Fill the trench with excavated soil and compact it firmly. Proper compaction removes air pockets, stabilizes the barrier, and helps it withstand weather conditions and animal pressure.
Double-Check Everything Before You Call It Done
Once the trench is backfilled and compacted, walk the full perimeter to verify that each edge sits flush against the mounting surface. Ensure all corners are fully sealed with no gaps that animals could exploit. Check that fasteners—such as staples, tacks, or screws—are fully seated and evenly spaced to maintain structural integrity. Look for sharp edges or protruding wires and fold them inward to prevent injury. Confirm that the mesh remains taut with no sagging or wrinkles, especially along seams, to provide consistent coverage. A smooth, tight hardware cloth not only enhances visual appeal with decorative patterns but also maximizes wildlife deterrence. Re-secure any sections that flex or shift under gentle pressure. Finally, perform a visual hand-safe inspection and document any adjustments made. Only consider the job complete once the entire perimeter has been thoroughly checked and all weaknesses corrected. Additionally, ensure you have used the correct spacing and fixings to avoid common mistakes that weaken the installation.